
Written By: Daniel Cina
What is Decarboxylation?
Decarboxylation is the process which activates the psychoactive elements in weed by turning the compound THCA into THC which is what gives us that awesome high feeling we all know and love. The decarboxylation process itself turns THCA into THC by the application of heat to the compounds. This means the decarboxylation process happens whenever you toke up. Say you were smoking a bowl of flower with your trusty lighter, the flame you use to ignite your bowl acts as the agent to begin the decarboxylation process as your cannabis is being combusted into the smoke or vapors that we all love to toke on. 
That same concept of applying heat is the same when cooking edibles. No matter what the level of the dish is, the decarboxylation of your cannabis is an essential step in cooking with weed. If you don’t put your weed through the decarboxylation process you will end up with meals that won’t get you high which is frustrating to say the least. However, no need to fear because Nectar is here to help you begin your journey with some different methods for the decarboxylation of your cannabis so you can make edibles with amazing terpene profiles that will send you to the moon.
What Temperature does Decarboxylation Happen At?
Managing the temperature when your weed is going through the decarboxylation process is absolutely critical if you want to effectively cook edibles. Weed decarboxylation for edible consumption is a little different from normal smoking to say the least. The cannabis needs to be decarboxylated in a “low and slow” fashion.
If the timing is off or the temperature is not high enough then your weed will not activate, but if the temperature is too high then you will burn off many valuable cannabinoids and terpenes which will effectively ruin your edibles. Achieving proper decarboxylation requires more of a Goldilocks approach where you need the temperature to be “just right” which is usually between 220-240°F. Most of the time anything outside of this range will affect the overall potency and terpene profile of your cannabis which is really just a total bummer when cooking with weed.
Method 1 ( Beginner): The Oven
Decarbing your weed in the oven is a good place to start on our decarboxylation journey. Utilizing an oven you can start the decarboxylation with some basic items in your kitchen. To start the decarboxylation process in an oven all you need is: 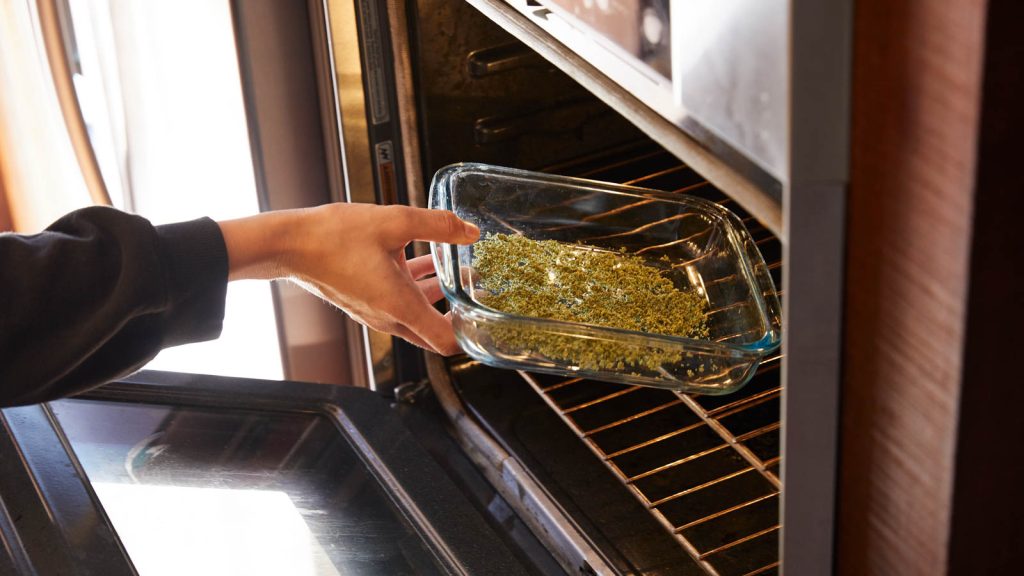
- Baking Sheet
- Parchment Paper
- Oven
- Cannabis
- Grinder (optional)
Directions
- Set your oven somewhere between 220-240°F so it can heat up while you prepare your cannabis
- Line the baking sheet with parchment paper (foil works to) then lightly break up your cannabis onto the sheet. If you prefer you can also grind your weed, but don’t grind it to finely to avoid burning during the decarboxylation process
- Place your tray into the middle rack of the oven and let it cook for 30-40 minutes stirring at least once
- Take it out and let it cool at room temperature for 30 minutes and you will have decarbed cannabis that is ready to be infused
Weed Decarboxylation in an oven is a great start for beginners, but it is not perfect. Conventional ovens have fluctuations in temperatures of about 20°F making the oven decarboxylation process an inexact science. Like the other processes on this list you will most likely achieve 70% potency activation at best. Not to mention this method will have your home smelling like weed so be sure to be mindful of these things should you decide to decarb weed in your oven
Method 2 (Intermediate): Crock Pot
Decarbing weed in a crock pot or slow cooker is a great method if you want a “set it and forget it” method to decarboxylation. The crock pot method is also good if you do not want your weed to stink up your house while it goes through decarboxylation. To start decarbing weed in your crock you only need a few simple items: 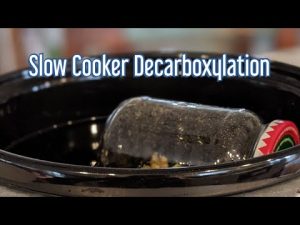
- Slow cooker(Crock Pot)
- Mason Jar
- Grinder
Directions
- Grind your weed coarsely (you don’t want your weed to be to finely ground)
- Place your weed in a mason jar (fill it ¼ -½ way with bud and don’t forget to put the sealed lid tightly back on your jar!)
- Fill the crock pot ½ full with water
- Set the temperature to high (about 210°F/98°C)
- Put the lid on the crockpot and let it simmer for 4 hours
- Check every 90 minutes to make sure the water level is ok (water will evaporate during decarboxylation process)
- When 2 hours has elapsed take the jar out and lightly shake to ensure your weed is being heated evenly (careful! The jar will be hot)
- After 4 hours remove the jar from the crockpot and set it aside to cool (do not take the lid off the mason jar until it has completely cooled!)
The crock pot is a great and fairly simple method, but as I previously stated these methods for the decarboxylation process are an inexact science and the same can be said for this method. Many people question if the crock pot method effectively activates the THC in the cannabis due to the cooking temp of 210°F, however it is a simple method to try and can be used with a degree of success for decarbing cannabis.
Method 3 (Advanced): Sous Vide
Buckle up everyone, we’re going to get fancy with this one. Decarboxylation via sous vide is a great method if you are going to be cooking with cannabis regularly. It does require the most items on this list, but this method is likely to yield the most consistent results out of the 3 methods here. So let’s dive into the sous vide decarboxylation method, what you need is: 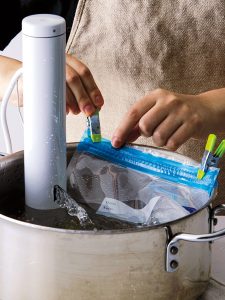
- Immersion circulator
- Plastic tub or regular pot
- Sous Vide bags
- Vacuum sealer
- Grinder
Directions
- Fill your tub about halfway with warm water
- Place in your immersion circulator and set it to 203°F
- Grind your cannabis finely (precise cooking method so you won’t burn your cannabis)
- Fill you sous vide bag with cannabis and vacuum seal it (you want to minimize air pockets and maximize surface area for your bag
- Place the bag in the water and let it cook for 90 minutes (use something to anchor the bag so it does not float around)
- After 90 minutes take the bag out of the tub
- Let the bag full cool then fully pat it dry before taking your cannabis out of the bag
Sous vide is a great method if you want to regularly cook with cannabis, and will yield fairly consistent potency, but it is an expensive method to choose. I recommend trying the other two methods before attempting this one due to the investment it requires.
Bonus Method: Ardent Nova Decarboxylator
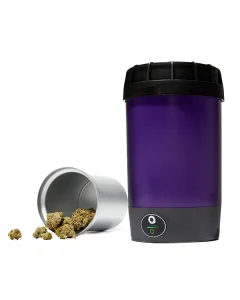
If none of these methods speak out to you, then I have an excellent alternative that will provide easy and convenient decarboxylation for you cannabis. Try out the Ardent Nova Decarboxylator, which amazingly makes the decarboxylation process incredibly simple. This amazing product also has a 97% potency rate meaning none of your weed is being wasted like the other methods on this list. This amazing and conveniently sized product will save you time and money. Check out our article about the Ardent Nova Decarboxylator then check with your local Nectar to get the premiere product in cannabis decarboxylation.
If this article has further piqued you interest in cooking with cannabis then check out our Cannachef article so you can attend the most exciting cannabis cooking competition in the PNW!
Ready to Start Cooking?
Now that you know the ins and outs of decarboxylation, you’re ready to take your cannabis experience to a whole new level. Remember: low and slow is the way to go.
Of course, great edibles start with great flower. If you’re searching for a dispensary near me to pick up quality bud for your next batch, Nectar has locations throughout Oregon, California, and Ohio. Our budtenders can point you toward strains that work best for whatever you’re cooking up.